We bought our current house in December 2014. We didn't have to move, but always knew that our wonderful house on Chesapeake Blvd, which we lived in for over 7 years, wouldn't be our "forever" house. So, we had fun searching for other homes via the Internet and driving by neighborhoods for several years-even meeting with realtors for several tours of ones we thought we were interested in and then even making an offer on one that didn't work out.
We had some things on our list for our new home that were negotiable and some things that weren't. So when we found our current house in October, it fit enough of our non-negotiables that we were willing to make a voluntary move.
Some of these items were the lot (large-1.5 acres and flat-ours backs up to woods rather than other houses), pool (which it had!) or spot for a pool (I grew up with a pool in the backyard, so my hot, Southern yard just feels lacking without one), location (close enough to both of our jobs that we could commute without frustration. We don't mind driving a bit, but the traffic is where we struggle, so being able to hop on the interstate and MOVE rather than just sitting still on poorly laid out back roads was our goal), storage (there's a 2 car exterior garage with storage above), natural light (lots of windows and even 2 skylights which I love!), and size (4 bedrooms which we thought would be enough for our family plus a guest room, but we had a surprise baby since then that will eventually get that 4th room, so I guess it worked out either way!). I also didn't want anything too big that I couldn't keep clean, so our square footage is pretty much exactly what we had before (2,000 sq ft). I didn't know it at the time because I've always lived in 2 story houses, but a huge bonus (in my opinion), is to have a 1 story house-who knew!? I LOVE all the rooms being accessible and it is just so much easier for me to clean and keep straight (even though the sq footage is the same, for some reason the layout just lends itself to more ease for me in these areas). So that has been so awesome and an added surprise.
The main things I felt I was negotiating on were exterior aesthetics (the yard is beautiful and exactly what we wanted, but the single story ranch style just isn't real pretty in my opinion), the kitchen and bathrooms (more on these later!), having only a laundry closet rather than an actual room (which has worked out fine since the closet is right beside the kids bathroom and bedrooms, I have only a few steps to gather/deliver everything anyway! And the guest bedroom is right there, so that is my folding room!), and the interior aesthetics (our other house was really cute and had a lot of charm that this one doesn't (yet!!) have...the previous owner at our other house was a really handy guy who had added so many things to the house to give it the charm that this one is missing...BUT I was excited to eventually add some of that charm back in myself!). I was more than willing to temporarily give these things up, but wanted hubby to know that these were things that I WOULD want to upgrade if we went with this house. We both agreed that we would start saving, planning, and scheming to do some of the facelifts as soon as we were able to after purchasing the house. And while it does require patience, it is also fun to plan and pick what we want. AND the cool thing about living in a house for over 3 years before getting to do anything to it is that now we really know what we want for changes!
Don't get me wrong, when we moved in, we did a ton! The couple before us built this house and it is almost 30 years old, so it was certainly dated! We replaced every light fixture, added recessed lighting, replaced the interior hinges/doorknobs and every vent cover, painted every room, had the ceilings scraped prior to moving in, removed wallpaper, removed a mirrored wall in the dining room (yes! ha!), and so much more that I can't even remember! Someday I will blog on that bc I know we took pictures along the way! But the first major thing we wanted to tackle was our kitchen (a biggie!!).
Below are a few pictures of the kitchen prior to us moving in.You can see the terrible 80's beach house tile that shows EVERYTHING. I am SO, SO excited to replace that. At first, we thought we would be happy just to give this kitchen a facelift (paint cabinetry white, get new flooring/granite counter tops and do most of the work ourselves just like we did in our old house). BUT after using this kitchen for several years, I began to really dislike the layout. I thought the butterfly corner sink would be great, but quickly grew to hate the bottleneck it created between the trashcan and the dishwasher. I couldn't open the door to the trashcan while the dishwasher lid was down, so we would just make a trash pile beside the sink while I was doing dishes and throw it all away once I was done-gross and inconvenient! Being unable to get to that spot easily also meant that the giant cabinet under the sink is not really used like it should be. I wasn't putting much in it because I couldn't easily get it out! And it's huge under there!
Another issue with it is that while loading the dishwasher, there is only a tiny spot to stand to do the dishes, and in reality it only allows for a small portion of the sink to be accessible (like 1/4th of it). In addition, the corner sink means my back is always to everybody, which I hate! I really wanted a more open feel to the kitchen so that I could be part of what was happening in the living room and not have to turn the sink off and yell back and forth at each other from the kitchen to the LR.
The third thing I struggled with was the spot right at the fridge and the bar. This is such a high traffic area, and with the fridge door open, no one could get through. I despise this! People just tend to stand right there in front of the fridge, too, so we were always having to squeeze past or ask people to move...it was just a very inefficient spot. But I loved the bar and didn't want to loose that!
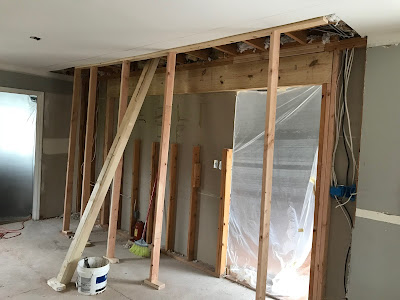
SOOOO....I began slowly presenting my ideas to Steven, who is a major planner and does not generally like change. But I am the dreamer, and he is the realist, so I really appreciate him because without him none of this would actually get done, and it would all just be a dream in my head. It took a LONG time, but he slowly warmed up to the ideas. I wanted to switch the location of the sink and the dishwasher and take down (partially) the wall that separates the kitchen and the LR. A big, lengthy, pricey endeavor that we didn't even know was possible! I also wanted the current bar completely gone and for a counter top to extend into the living room for the bar area to be there instead of right beside the fridge.
We met with AB in June at our house and they determined that the wall could come down, but would have to have a header because it was load bearing. Not the exact look we wanted, and a little more money, but still much better than a closed off wall. If we were going to loose that wall, we would have to put additional cabinetry in the dinette to make up for it. So, we came up with a design for that as well.
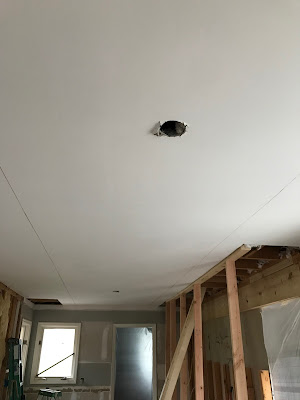
We pretty much kept the kitchen like you see it above except that the ceilings were scraped, the door that separates the dining room and the kitchen came down. We painted, put new bar stools in and replaced the fan with some cute schoolhouse lighting. But for the most part it stayed the way you see it
above.
Finally, on March 13, our kitchen renovation began! Almost a year ago we started talking to AB Stone about our ideas. We had
some other folks come out, too, but eventually decided to go with AB.
We met with them several times and they drew up our plans, we tweaked
them over and over, and eventually decided we would be able to start in
the Spring of this year. The project is supposed to take 4-6 weeks, barring no complications. The weekend prior to them doing demo, we cleaned everything out and Ben helped Steven remove appliances. Where does all the stuff come from!?!? Geez! Our cabinets were packed. But we were excited and nervous to get started.
 |
| Goodbye dishwasher!! This one is old and does not work well, so I am pumped to get an upgrade! You can see Henry is right in it...he is excited to see everything coming together. |
 |
| I boxed up a bunch of stuff for the garage, but also loaded our dining room table with some of the kitchen junk and covered it with plastic. |
 |
| Goodbye, stove! Same story as the dishwasher...can't wait for an upgrade! From here you can see some of the lighting Steven put in when we moved in. |
 |
| We removed the microwave and put it temporarily in our bedroom as part of our make-shift kitchen. |
 |
I moved all of our food into the bedroom and bought paper products for the meals we would eat at home. We knew we would be eating out or eating simply for the most part.
Below is the kitchen all cleaned out and ready for demolition!
Above is the dinette. There will be a built in cabinet to the right for extra storage and Steven's dad is building us a rectangular table with benches that can be slid under to hopefully save on some space. Until now we have had a vintage square metal table in the center, but now that we are a family of 5 that table doesn't fit our needs anymore!
|
 |
| And this is our make-shift bedroom kitchen! Nothing like waking up to a highchair, crockpot, and table to one side of you... |
 |
| And a fridge and microwave on the other side of you! Midnight snack anyone?! Ha, ha! It's fine. Just kinda crazy. I emptied our armoire and filled it with our food for a temporary cupboard. It works. |
 |
| And here are the kids eating breakfast on our bedroom floor the next morning....they think it is great and an adventure! The first few weeks we had crummy weather, but now the weather is really nice and we can eat outside and just play after naps. There is MUCH MORE to come.....stay tuned for updates as we renovate our kitchen! Whoohoo! |
|
|


